Simple Calculator in Python
A calculator is one of the most practical beginner projects in Python, but it’s also useful for professionals because it reinforces how to design clean functions, validate user input, and handle edge cases safely. In this tutorial, We’ll build a Command-Line Interface (CLI) Simple Calculator in Python that performs four essential arithmetic operations: addition, subtraction, multiplication, and division.
Even though the final script is short, it demonstrates several core programming skills that show up in real-world software:
- Breaking a problem into small reusable functions
- Reading input from users via the terminal
- Converting string input to numeric types like
float - Using
if/elif/elseto choose actions based on user choices - Handling an important edge case: division by zero
By the end, you’ll fully understand how the code works, how to build it step-by-step, and how to run it like a real mini project.
What You Will Build
You will build a Python program that:
- Displays a calculator menu.
- Lets the user choose an operation using a number (
1,2,3, or4). - Accepts two numbers from the user.
- Performs the chosen operation using a dedicated function.
- Prints the result.
This is intentionally kept lightweight and clear so that students can learn it easily, and developers can use it as a base to extend into larger projects (like loop-based calculators, history tracking, error-proof input systems, or even a GUI calculator).
Prerequisites
You don’t need advanced knowledge to follow this tutorial. Here’s what you should have:
- Python installed (Python 3.8+ recommended)
- A code editor (VS Code, PyCharm, Sublime Text, or even Notepad++)
- Basic familiarity with:
- variables
- functions
if/else- taking input with
input()
If you can run a Python file from the terminal, you’re ready.
Step 1: Create the Project Folder and File
A small project becomes easier to manage when you give it a clean structure.
- Create a folder named:
python-cli-calculator - Inside the folder, create a file named: Simple_
calculator.py
Your project is now set up. Even though it’s just one file, this “project mindset” is important when you build bigger applications later.
If you installed Anaconda, you can also write and run this project using Jupyter Notebook. Create a new notebook, paste the code into a cell, and click Run (or press Shift + Enter) to execute the cell and see the output.
Step 2: Understand the Project Design
Before writing code, it helps to plan the design.
Why use functions?
You could write all calculations inside if blocks. But using functions makes your code:
- Reusable: You can call the same function many times.
- Readable: Each function clearly describes what it does.
- Maintainable: If you change logic later, you update it in one place.
In professional codebases, functions are a standard way to keep logic clean.
The four calculator operations
We will create four functions:
add(x, y)→ returnsx + ysubtract(x, y)→ returnsx - ymultiply(x, y)→ returnsx * ydivide(x, y)→ returnsx / ybut must safely handle division by zero
This design keeps every operation isolated and easy to test.
Step 3: Write the Arithmetic Functions
Open calculator.py and start by writing these four functions.
3.1 Addition
The add function takes two parameters and returns their sum.
Why parameters? Because you want your function to work with any inputs, not fixed numbers.
def add(x, y):
    return x + y
Code language: JavaScript (javascript)
3.2 Subtraction
Subtraction is similar. The function returns the difference.
def subtract(x, y):
    return x - y
Code language: JavaScript (javascript)
3.3 Multiplication
Multiplication returns the product.
def multiply(x, y):
    return x * y
Code language: JavaScript (javascript)
3.4 Division (with safety)
Division is where we need to think like a developer. In mathematics, division by zero is undefined, and in programming it often causes a runtime error.
So instead of letting the program crash, we handle the case gracefully.
def divide(x, y):
    if y == 0:
        return "Error: Division by zero"
    return x / y
Code language: JavaScript (javascript)
What’s happening here?
- If
y == 0, we don’t divide. - Instead, we return a friendly error message.
- Otherwise, we return the division result.
This is called defensive programming—writing code that anticipates and handles invalid conditions.
Step 4: Display the Calculator Menu
Now that the calculator “engine” (functions) is ready, we build the user-facing menu.
A CLI project needs good text prompts so users understand what to do.
print("=== Simple Calculator ===")
print("Choose operation:")
print("1. Add (+)")
print("2. Subtract (-)")
print("3. Multiply (*)")
print("4. Divide (/)")
Code language: PHP (php)
Why multiple print() calls?
- It keeps the menu readable.
- It’s easy to modify later.
- It matches how CLI tools often present options.
You could also store menu text in a multi-line string, but this style is simple and beginner-friendly.
Step 5: Take User Input
The input() function reads text from the user in the terminal.
5.1 Operation choice
op = input("Enter Number (for e.g 1 For Add, 2 for Subtract ): ")
Code language: JavaScript (javascript)
Important detail: input() always returns a string.
So if the user types 1, Python stores it as '1'. That’s why later we compare op to '1', '2', '3', and '4' (strings).
5.2 Number inputs
Now we ask for two numbers.
a = float(input("Enter first number: "))
b = float(input("Enter second number: "))
Code language: JavaScript (javascript)
Why convert to float?
- It allows decimals like
10.5. - It also works for integers because
float("10")becomes10.0.
If you used int(), you would limit inputs to whole numbers only.
In professional tools, numeric parsing is often combined with validation, but for this version, float() is a good starting point.
Step 6: Apply Logic Using if/elif/else
Now we implement the decision-making part: depending on the user’s chosen operation, we call the correct function.
if op == '1':
    result = add(a, b)
elif op == '2':
    result = subtract(a, b)
elif op == '3':
    result = multiply(a, b)
elif op == '4':
    result = divide(a, b)
else:
    result = "Invalid operator"
Code language: PHP (php)
Why store the output in result?
We want a consistent way to print the final output. Instead of printing inside every block, we store the output once and print at the end.
This makes the code easier to extend later. For example:
- You could add logging.
- You could add result history.
- You could add formatting rules.
Why use elif instead of multiple if?
Because only one operation should be executed. With elif, once a match is found, the rest of the conditions are skipped.
Step 7: Print the Final Result
Finally, we output the result:
print("Result:", result)
Code language: PHP (php)
This line is intentionally simple. It works whether the result is:
- A number (like
15.0) - A message (like
"Error: Division by zero") - A validation error (like
"Invalid operator")
This is a small example of writing code that works well with multiple possible output types.
How to Run the Project
Once your calculator.py file is saved, run it from your terminal.
On Windows
- Open Command Prompt or PowerShell (or Anaconda Prompt if you installed Anaconda). You can also run the same code in Jupyter Notebook by pasting it into a cell and executing the cell.
- Navigate to your project folder.
- Run:
python Simple_calculator.py
Code language: CSS (css)
On macOS/Linux
python3 Simple_calculator.py
Code language: CSS (css)
If your Python setup uses python for Python 3, then python Simple_calculator.py also works.
Example Output (What Users Will See)
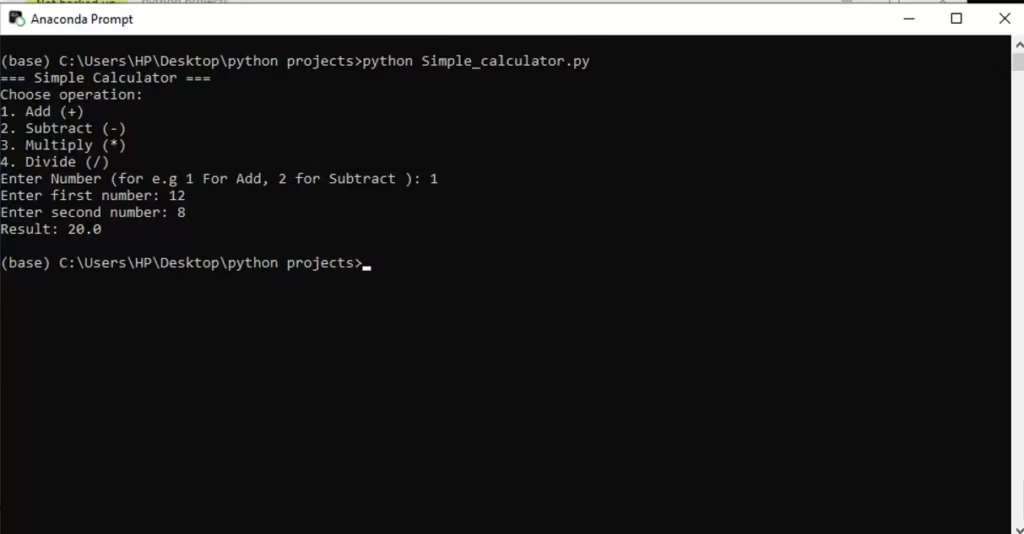
Example 1: Addition
User selects addition and enters two numbers:
Example 2: Division by Zero
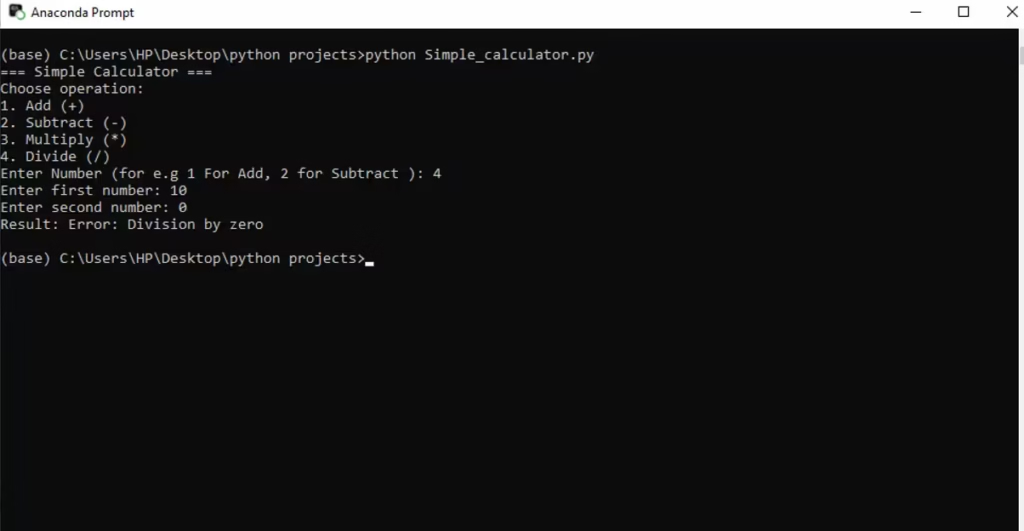
Notice how the program does not crash. It stays stable and prints a clear message.
Code Walkthrough Summary (Why This Project Matters)
Even though it’s a small script, this project teaches skills that scale:
- Functions are how you create reusable logic.
- Input handling is the first step toward user-friendly tools.
- Conditionals let your program make decisions.
- Edge case handling (division by zero) prevents runtime failures.
Many real applications are built from these same building blocks—just at a larger scale.
Improvements You Can Add
If you want to make this project more professional, here are upgrades you can implement later:
- Input validation for numbers
- Right now, typing text like
hellowill crash the program becausefloat("hello")fails. - You can handle this using
try/except.
- Right now, typing text like
- Keep the calculator running in a loop
- Currently the program runs once and exits.
- You can add a
while Trueloop and a quit option.
- Support more operations
- Modulus (
%), power (**), square root, etc.
- Modulus (
- Format output cleanly
- Example: showing
2instead of2.0when possible.
- Example: showing
- Add unit tests
- Professionals test functions like
add()anddivide()usingpytestorunittest.
- Professionals test functions like
These upgrades can turn a beginner project into an interview-friendly mini application.
The Complete Code
def add(x, y):
    return x + y


def subtract(x, y):
    return x - y


def multiply(x, y):
    return x * y


def divide(x, y):
    if y == 0:
        return "Error: Division by zero"
    return x / y


print("=== Simple Calculator ===")
print("Choose operation:")
print("1. Add (+)")
print("2. Subtract (-)")
print("3. Multiply (*)")
print("4. Divide (/)")

op = input("Enter Number (for e.g 1 For Add, 2 for Subtract ): ")
a = float(input("Enter first number: "))
b = float(input("Enter second number: "))

if op == '1':
    result = add(a, b)
elif op == '2':
    result = subtract(a, b)
elif op == '3':
    result = multiply(a, b)
elif op == '4':
    result = divide(a, b)
else:
    result = "Invalid operator"

print("Result:", result)
Code language: PHP (php)